Friday, August 23, 2013

FREE KNITTING PATTERN-Basic Men's Beanie

If you're looking for a basic men's beanie knitting pattern, good for beginners and worked up on two needles, you have come to the right place!  Feel free to sell what you make from this pattern, but please refer back to this post for pattern credit.  Please do not re-post this pattern without including a link to this original post.


This is my very first free pattern, so please bear with me as I work out any details which are unclear or need explanation.  Please comment if you find something that needs to be looked at.

What you'll need:
Size 10 needles
Medium weight worsted yarn *note that if you use a thicker yarn, adjust your needle size
Tapestry needle
Tape measure

Abbreviations:
K-Knit
P-Purl
K2TG-Knit 2 together

What to do:
CO 72 (this makes a large men's hat.  Reduce the number of CO stitches in multiples of 2 to customize the sizing)
2X2 ribbing for 5 rows, or about an inch or so (for a longer brim, knit more rows of ribbing):

Row 1: *K2, P2* (*repeat across)
Row 2: same as row 1

Once your ribbing is complete, you will begin the body of the hat:
Row 1: K each across
Row 2: P each across
Continue these two rows for approximately 8 1/2".  For a longer hat, or one with a folded brim, add a few inches to this. UPDATE: this makes it long enough for a fold over brim.  If you want it without that option, lessen this to about 7". 


Now, you will begin the decreases to form the crown.

Row 1: *K2TG, K2* repeat across
Row 2: P each across

You will continue this until there are 12 stitches left.  With a tapestry needle and a long tail, weave the needle through the 12 stitches, being careful not to forget any.  Remove the knitting needle and pull tight to close the hat.  Do not cut the tail, as we will be using this to seam up the side.

Fold the hat with right sides together, so the outside of the hat is on the outside and line up the edges. 


Now you are going to seam up the edge.  Insert the needle into both layers of the hat, pull tight (but not so tight that it makes the seam uneven), bring the yarn in front of the work, and into the next stitch in the seam.  There are a lot of great YouTube videos out there on how to seam up your knitting work.  The mattress stitch method is a bit more challenging, but makes an invisible seam. 


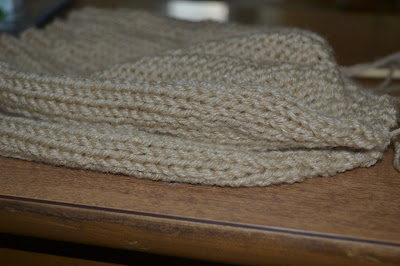
Once you finish your seaming, tie the seaming yarn to the original tail of the work and weave in the edges.  Turn your work so the right side is out.  Your seam will look something like this:

And guess what!? You're done! Congratulations on your newly knitted hat!

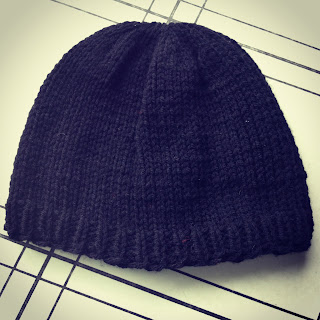
*the black one was made a little shorter in length

If you would like to purchase one of these hats, head on over to Crooked By Design and request one!

Tuesday, August 20, 2013

Washington County Fair 2013


It's here! The Washington County Fair opened last night and you don't want to miss all the fun.  We went last night for the opening, which began at 5pm.  The fair, which features lots of live animals, tractors, tons of food, rides, games and so much more, runs all week. 
 *yes, my son is a Ninja.  He was a racecar driver earlier in the day.  An Army guy the day before that.


Here's some general information about admission and pricing (from their website):

Gates Open at:

5 PM Monday
9 AM Tuesday - Sunday

Building Hours:

Tuesday - Saturday: 10:00 am to 10:00 pm
Sunday 10:00 am to 9:00 pm
Rain or Shine

Carnival hours:
Mon.: 5:00 pm to 11:00 pm | Tues. - Sat.: Noon to 11:00 pm
Sun.: Noon to 9:00 pm (Weather permitting for your safety)

Sorry! NO pets allowed at the Fair


Admission:

General Admission...........$10.00
(Purchase before Aug. 1….$9.00)
(does not include carnival rides)
Under age 14....................FREE
Parking............................FREE
All Week Ticket ...............$30.00
(Purchase before Aug. 1….$27.00)
Senior Citizen Day....$5.00
(62 or older) Wednesday ONLY

They do offer a military discount for active military so bring your id!

Now, one thing I wish I had done before heading to the fair with an excited almost three year old, was to check out the tickets for the rides and see if there were any discounts.  Let me tell you, I would have saved a bundle because the rides were very expensive.

This boat ride, for example, cost three tickets and tickets were $1 a pop.  The Ferris wheel took five tickets per person, so for my husband to take our son on for a ride it set us back $10.  This was outrageous to me.  Maybe I'm just not used to NY state fairs, but this would quickly get expensive for a larger family.  Unfortunately I found out too late that if the tickets were purchased before August 18,  a discount is given and you can get a sheet of 20 tickets for $8.  I guess this is a great lesson for next year.  So beware, fellow fair goers, you will have a very thin wallet by the time you leave the ride section.  But really, his face on this $3 circle was priceless.

There are a couple ways to still save, however!
Carnival Fun Day-this is today, August 20, 2013, and you can ride all the rides for $20 from noon to 11pm.
Children's Day-go to the fair on Thursday and kid's high school aged and under get in for free and rides are one less ticket per go.  
Family Fun Day-go on Sunday and you can enjoy all the rides for $20 from noon to 9pm. 

*I am not certain if this is per child, or per family, so I would ask the ticket booth attendant. 
 

 The highlight of the fair for us was all the animals, especially these little ducks which you are able to hold. 


There were also tons of cows, horses, chickens, roosters, sheep, more pigs and some I'm sure I missed.  My son was delighted over the animals. Next up, was the tractors.


This last one was especially exciting for my guy since it was an Army truck brought by the National Guard.  My husband is leaving for basic training with the Guard soon, so my son has become obsessed with all things Army!

Now for the food.  As any gluten-free-ers know, going to a fair is a little depressing.  Seeing everyone enjoying those corn dogs, like my husband here:

 
And the fried dough! What would I give for some fried dough.  But there was a french-fry-heating-light at the end of the tunnel.  After searching and praying and hoping, I found a stand with gluten free fries!  Full disclosure, as far as I could tell, they were all set.  I am very sensitive and I had them no problem.  I asked, and they are exclusively french fries, made from fresh cut potatoes and nothing else goes in the fryer.  (There was no official "gluten free" sign).  Skip the malt vinegar, of course, and I wouldn't trust the cheese sauce, but boy oh boy were they delicious.  Look for this cart if you are looking for them:


For all you non-gluten-free-ers, there is so much to enjoy in the food department.  Seriously, I am eternally envious.  My guy loved the cotton candy and indulged in his first chocolate milkshake.  

By the time we left, this was pretty much the face on my sugar crazed kid:
 

Are you planning a trip to the fair? What's your favorite part?


Sunday, August 18, 2013

Gluten Free French Onion Soup


My relationship with french onion soup is a strange one.  You see, I hate onions. Hate them.  But french onion soup, with its gooey cheese and amazing broth is one of my all time favorite foods.  Of all the things I miss since going gluten free, being able to order a crock of the delightful soup at a restaurant is what I miss the most.  But fear not, my fellow anti-gluten-ers, this recipe is easy to make and delicious to eat.  You'll forget about those restaurant ones.

What you'll need:
3 large sweet onions-sliced thin
2 tbsp butter
1 qt. beef broth (Hannaford brand is gluten free)
3/4 c. chicken stock (Hannaford brand if gluten free)
1/8 tsp pepper
1/4 tsp thyme
1 bay leaf
salt to taste
1 tbsp red wine vinegar


Variations:
Try out some other ways of making this by adding some gluten free beer to broth, or a little red wine.

What to do:


Saute the onions and butter on medium-high for 10 minutes, stirring every few minutes.  Reduce heat to low and saute them for another 30-35 minutes until soft.  Add the beef broth, chicken stock, seasonings and vinegar.  Heat to a boil.  Reduce heat and cover, cooking for another 15 minutes.  Remove the bay leaf.


Once the soup is in the bowls, top it with your favorite gluten free bread and cheese.  I use Swiss and provolone, but you can use whatever you like. Asiago would a nice touch.  I usually do mine without the addition of bread, and its still wonderful.  Broil for a few minutes until the cheese is good and bubbly and enjoy!

This is even a hit with Atticus. One of his favorites!

*I suggest enjoying this with Against the Grain baguettes.  You would be hard pressed to find a yummier gluten free bread product. 

Against The Grain Gourmet


Tuesday, August 13, 2013

Fun with the Tang Museum at the Library


When I told Atticus we were going to the library today to do an art project, the first thing he said was, "right now, Mom!?"   He couldn't wait to start the project.  As part of an annual visit to our local library, the Tang museum provides free art programs as part of the Summer Reading Program. 

This year the theme was sculpture and based on this piece of art:
What I loved about this program was that before diving into the hands-on part, making a sculpture of their own, the kids were encouraged to talk about art, and what they saw when looking at this specific piece of art.  It was amazing to see what their imaginations saw, from a fork, to an alien and a camera tripod.  They talked a little about abstract art and how art can mean different things to different people.  My guy is just under three, so it was a little over his head, but even he was getting into it, telling me it was a rocket ship, or a "guy." 


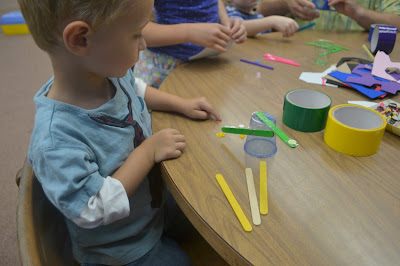
The kids were given supplies such as pipe cleaners, a small plastic cup, Popsicle sticks, tape, and buttons and asked to create their own version of the artwork they discussed. 

 Atticus was so excited, he asked to make two, both of which he gave mustaches (he has become obsessed with mustaches...).

At the conclusion of the program, which ran about an hour, the kids were asked to put their work on display for others to admire, and participate in an Appreciation Circle.  Here, they got to talk about what they liked about each other's work.  Atticus liked the tallest one because, as he said, "it tall like me!" 


If you ever have a chance to attend a Tang museum library program, I highly recommend it.  Kids of all ages can appreciate and have fun with these projects and it is a wonderful learning and creative opportunity. Also, if you are in the Southern Adirondack Library System (SALS) be sure to check your Summer Reading calendar, because the Tang may be making a stop near you!

To stay connected with the Tang, here is some information:

Telephone: 518-580-8080
Website: www.skidmore.edu/tang
Facebook: www.facebook.com/TangMuseum
Twitter: https://twitter.com/TangMuseum

Wednesday, August 7, 2013

Mickey or Minnie Mouse Hat Giveaway!

 Ok, everyone, I have a giveaway for you!  These Mickey and Minnie's have quickly become a best seller at Crooked By Design!

Since I'm so excited Crooked By Design just had its 150th sale, I want to thank you with two giveaways!  This first one lasts for one week, so be sure to get your entries in.  Next one starts when this ends, so stay tuned for details on it!


  a Rafflecopter giveaway

Friday, August 2, 2013

Gluten Free Buffalo Chicken Wing Dip

It doesn't get much better than Buffalo Chicken Wing Dip.  It's the perfect side to bring to a party, or starter for your own get togethers.  I don't like blue cheese (that's an understatement, I loathe blue cheese), so here's what I do to make a delicious dip, with ranch, gluten free.


What you'll need:
2-3 chicken breasts
2 cup bag of shredded cheese (Cabot is the absolute best)
1/2 cup of gluten free ranch (or buffalo ranch)
1/2 cup Frank's Red Hot (feel free to use any brand, this is the one I like best) 
8 oz of softened cream cheese (or the low fat version I use, pictured below)


 First thing you'll want to do is get the chicken started.  You can cook it any way, and shred it, but I find the easiest way is to poach it by simply boiling it with a tbsp of white vinegar.  Over cook it a little and it will shred easier.


Next, in a bowl, mix together the cream cheese, hot sauce and ranch, and mix until the cream cheese is blended.

Add the chicken and mix.


Lightly spray a baking dish and spread the dip evenly in the pan.


Load it up with cheese on top and its ready for the oven!

Place in preheated 375 degree oven and cook for about 25 mins, or until the cheese begins to brown and bubble.


Serve with tortilla chips or fresh carrots and celery, but watch out, it doesn't last long!
© Chronicles of a Knaptime Knitter. Made with love by The Dutch Lady Designs.
01 09 10